An expert in the field of lash extensions knows that waterproof mascara is not always enough to get the job done.
Extensions for the eyes are a fast and simple beauty fix, but they can be expensive and require regular upkeep. Latch lifting satisfies this need because it is a much more natural and low-maintenance option.
If your clientele is looking for a quick and cheap way to improve the appearance of their lashes, you should consider offering lash lifts.
The more prepared you are with this resource at hand, the sooner you can start providing this in-demand service to your clients.
Learn About Lash Lifts

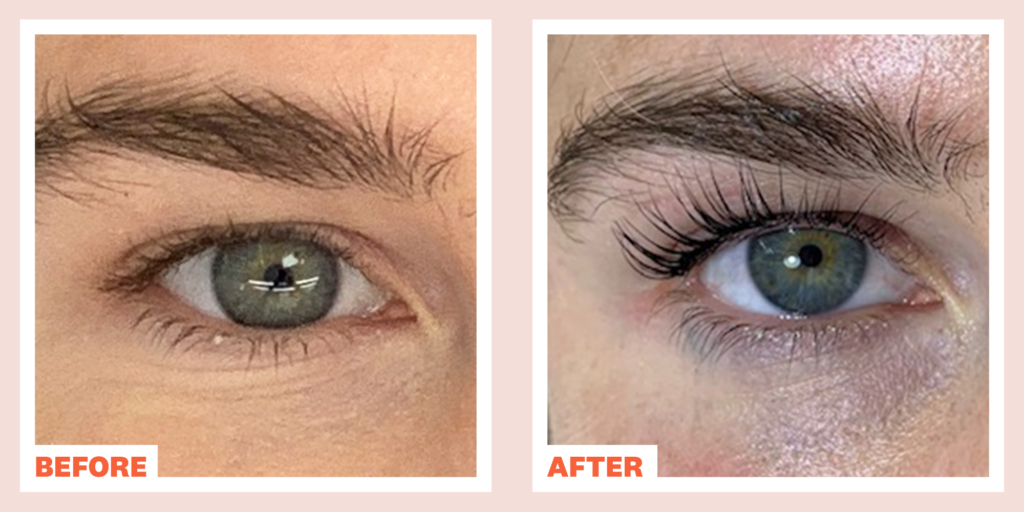
In a lash lift, the client’s eyelashes are lifted and curled at the base to give the impression of longer, thicker lashes.
The results of this semi-permanent treatment can last up to two months, meaning you can skip the daily routine of applying mascara and curling your lashes.
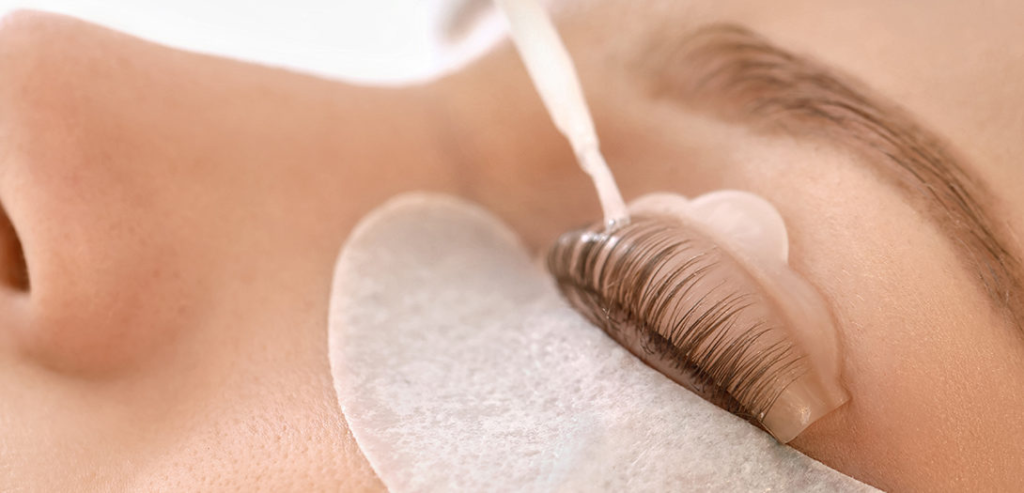
This technique involves applying a lifting solution to the lashes, followed by a setting solution to ensure the lift lasts.
After the lashes have been permed, a darker tint is applied to make them stand out. The procedure itself takes about an hour on average, and there is no recovery time.
Lash Lift Care and Maintenance
Clients should avoid getting their lashes wet for at least 24 hours after the treatment. By giving the hair cuticles some space to close, we can help them follow their normal growth cycle.
Do not use a scrubby or rubbing motion when cleaning the lashes. Change to a mild cleanser that does not contain oil.
Also, the bonding solution can be weakened if oil-based products are used near the lashes within the first 48 hours after the lift.
Maintaining the lashes’ pliability and moisture after a perming treatment can be achieved by applying a nourishing agent specifically designed for use on lashes regularly.
Finally, to ensure the lift lasts as long as possible, clients should let their lashes rest and recover for a few days after treatment.
By adhering to these aftercare guidelines, your clients can protect the results of their lash lift treatment and keep their lashes looking beautiful and lifted without interfering with the lash growth cycle.
Process Of Lash Lift

Lash lifting can dramatically enhance your client’s lashes’ natural curl and definition. Learn the fundamentals of the trade and you will be on your way to a successful career as a lash artist in no time.
Examining the client’s lashes and estimating how long the lifting and setting processes will take is necessary before beginning the lash lifting procedure.
Make sure your client’s lashes are free of any debris, oils, or makeup before attempting a lash lift.
When placing cotton pads over a client’s lower eyelids, it is important to make sure they are spread out evenly and lying flat against the skin.
By starting with the lower lids, you will have more room to work in the upper lids.
For this, you can use lash lift shields, rods, or curved silicon pads to adjust the position of your upper eyelashes.
Put the silicone shield over your client’s eye, just above the lash line, and lift your upper eyelid a little. Smooth out any folds and wrinkles.
Using a tiny brush or applicator, you must apply the bonding solution, also known as lash lift adhesive, to your eyelashes.
Gently press the lashes against the silicon pads until they fully adhere and the lashes are lying flat against the pads, using the brush or applicator to achieve this.
If you do not brush your natural lashes carefully, the bristles can tangle with your lashes.
After applying the bonding solution and pressing the eyelash extensions firmly against the silicon pads, double-check that no clumps of lashes have stuck together.
A little extra bonding solution in areas where the lashes are sparse or uneven can help you achieve a more uniform and natural look.
To achieve the best results, certain steps must be taken. First, if your natural lashes are in good condition, cover the middle third of their length.
Apply a thin layer of lotion 1 further out from the hair’s ends to avoid getting it in the roots. If your lashes are thick or damaged, you may need to increase the processing time from the recommended 9-14 minutes.
When processing eyelashes, 15 minutes is the absolute maximum we would recommend. It is important to avoid getting the lotion in your eyes because doing so could trigger irritation or other reactions. Due to the potential for an allergic reaction, it is advised to perform a patch test at least 48 hours before treatment.
After the specified time has passed, remove the first lotion and replace it with the second. Like with Lotion 1, Lotion 2 can be applied to the lashes with a tiny brush or applicator.
Waiting a few minutes after applying Lotion 2 is recommended to let the product fully set; however, the exact amount of time required to do so will vary depending on the product used, the desired degree of curl, and the health of your natural lashes.
You can carefully separate the lashes from the pads using a damp cotton swab or a tiny brush.
Remove even the most tenacious lashes from the curling rod with the help of our Keratin Lotion No. 3. If you pull or tug too hard, you might break or damage the lashes.
Begin at the base and work your way up to the tips, lifting your lashes gently away from the pads as you go.
Retaining even a trace of the solutions can cause irritation or other problems, so it is important to remove them completely.
Coating the lashes with the tint and ensuring a uniform layer of color across the lashes using a small brush or applicator constitute the steps involved in applying lash tint.
Focus on the base of your eyelashes, as this is where the tint will be most visible.
When performed after a lash lift or lamination, the tinting process can take up to 5 minutes, depending on the product used and the desired level of color saturation.
After cleansing, apply Keratin Lotion 3 with dry cotton swabs or one of our bamboo applicators. With the cotton swabs or bamboo applicators, carefully wipe the tint from your eyelashes in a back-and-forth motion.
Lashes are fragile and can easily be broken, so it is important to reach the bottom without tugging or pulling. To avoid damaging the window or damaging yourself, removing the tint may take some time.
Achieving the best possible results from a lash lift treatment requires regular upkeep of healthy, strong lashes. Apply the lush plump to your lashes with a small brush or applicator until they are saturated.
Allow the lush plump to fully absorb into the lashes before applying any other products or makeup.
After the lash plump has been absorbed, you can continue with your regular beauty regimen. In three to five minutes, using a lip applicator, gently remove the lash plump.
Lash Lift Kits for Flawless Eyelashes
You can now offer your clients gorgeous, lifted lashes with the help of our lash lift kits. The following are just some of the many eyelash curling kits that are available from Flawless Lashes.
Lift Rods – The eyelids of your clients will not be scratched or irritated by these silicone rods. By using lift rods and lash lift glue, you can comb your lashes into the form you want.
If you use our water-soluble adhesive on your lash lift, your lashes will remain securely attached to the silicone rod.
Lashes can be easily separated and shaped with the help of the Lift Tool.
To prime the hair cuticles for Lotion 2, apply a thin layer of No. 1 starting at the base of the lashes and working your way up.
Lotion No. 3 eliminates the greasy or sticky film left behind by some products.
Flawless Lash Plump (also known as lash botox or lash filler) is a combination of keratin, vitamins, hyaluronic acid, and nourishing oils that improves the health, strength, and thickness of your natural lashes.
Tint, cream developer, and nourishing keratin treatment are all released simultaneously with just one pump of our time-saving bottle of Keratin Tint.
FAQ
To what extent before you start to lash lift treatments?
Anyone who has completed a course at a recognized lash academy can advertise themselves as a professional lash lift specialist.
Research into the different types of lash lifts, when to use them, and how to avoid injury is essential.
Preparation is key when offering lash lift services, and Flawless Lashes offers thorough online training for this. Our classes require no prior knowledge or experience in the field of cosmetics.
If you get your lashes lifted, will it hurt them?
If done by an experienced professional, lash lifts are completely safe for your lashes. You may be dissatisfied with the results of your lash lift if it is performed poorly or by someone without experience.
The only caveat is that it must be done by a certified professional for it to be acceptable.
Is it risky giving myself a lash lift?
Yes, a lash lift should never be attempted at home. To begin, there are no regulations concerning lash lift kits, but only qualified lash lift specialists should perform the procedure.

Jean Smith is a fitness enthusiast and blogger who focuses on fitness and a healthy lifestyle. She is passionate about assisting people in living healthier lifestyles and is constantly on the lookout for new and creative methods to stay fit and healthy. Her articles are excellent resources for anyone interested in improving their health and fitness.
